Remotely Controlling a DeLonghi Oil Radiator using Home Assistant, ESPHome and ESP32

Turning a dumb heater into a smart one.
This is an old post!

This post is over 2 years old. Solutions referenced in this article may no longer be valid. Please consider this when utilizing any information referenced here.

So here we are in October. COVID-19 is still with us and I am still working from home. Meanwhile, summer has quickly changed to autumn. The leaves are falling as are the temperatures. My house was the model home for our neighborhood, and what would have been the garage was finished in and used as a sales office. So when we bought the house, I was like, perfect, a perfect spot for an office!

But the problem is that, because it was a garage, it’s not connected to the house’s HVAC system. In the summer there is a mini-split that keeps the whole area cool. But it’s kind of loud. However, I do have some of these DeLonghi Oil Radiators to use in the winter which provide abundant, silent heat without using very much power. But the downside is that they take awhile to warm up.

Wouldn’t it be cool if I could have them turn on an hour early and “pre-warm” the office? Well, to get the obvious part out of the way, yes, there is timer functionality, but that is not nearly as cool as tying it into the rest of my smart home. But it has a remote. What if I could find a way to use Home Assistant to send IR commands to the heater?

Turns out you can!

Getting Started

To get started, you’ll need at least some basic familiarity with electronics. But don’t worry, you don’t need to be an EE to do this, you just need some basic understanding of things like circuits, transistors, and LEDs. You’ll also need some parts. I have included my parts list here:

If you are using a different heater than the DeLonghi, I recommend also getting:

You’ll be able to use the IR receiver to decode what your current remote is doing, so you know what codes to send.

Wiring Your Circuit

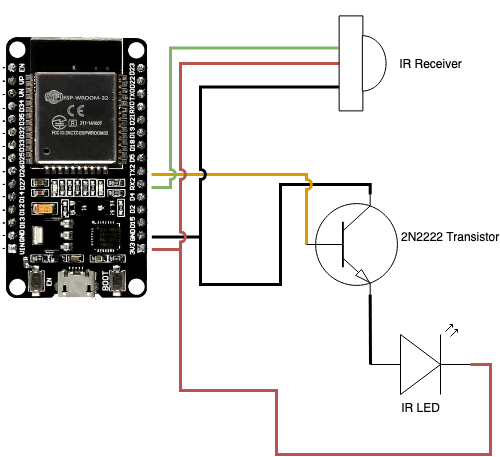
The circuit we are going to create will look something like this:

Schematic for our IR transmitter and receiver.

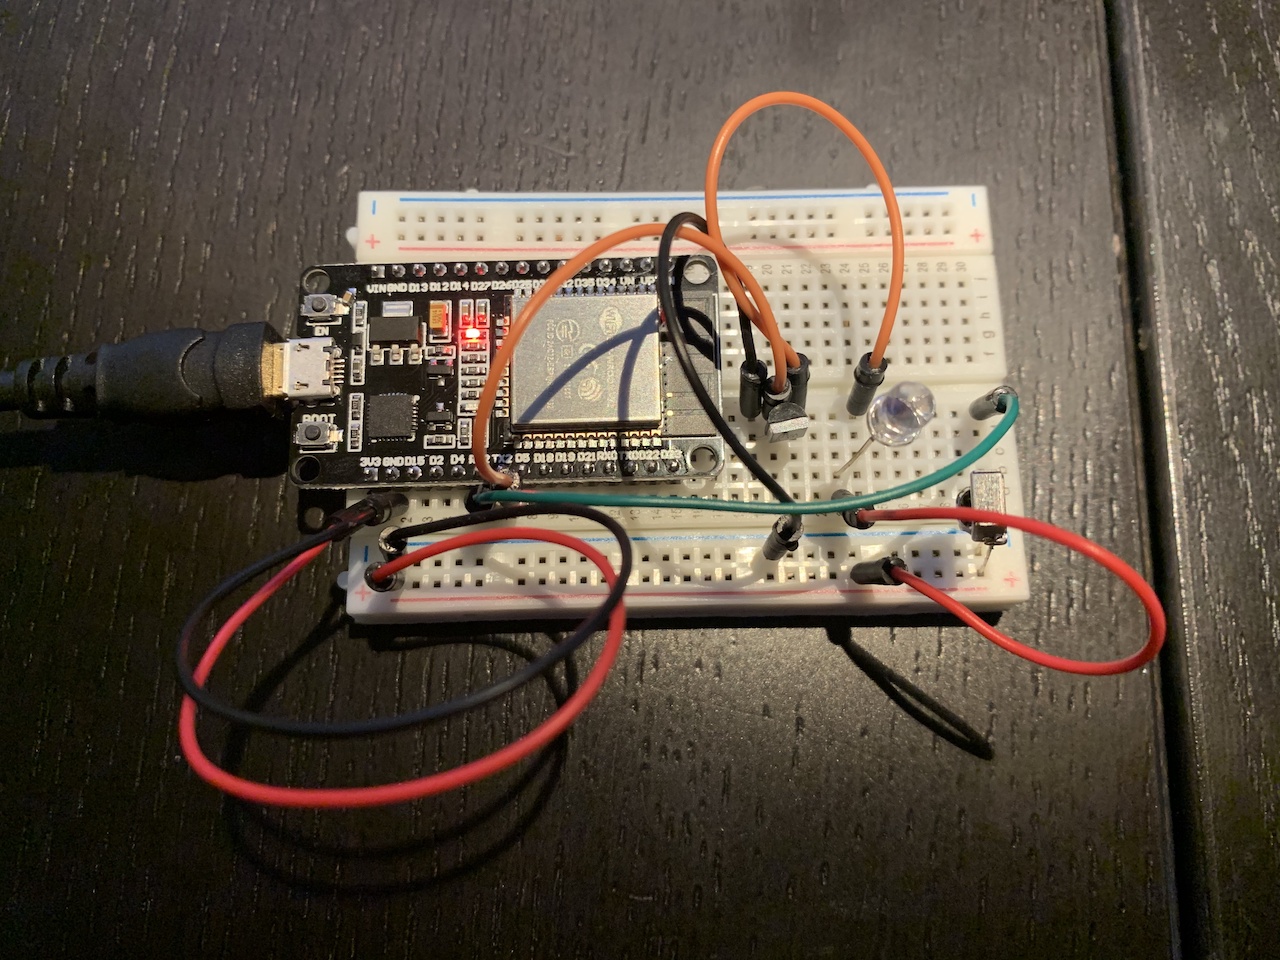
When assembled on your breadboard, it might look something like this:

Assembled prototype on a breadboard.

Some quick notes about this:

  • If you aren’t familiar with how breadboards work, the holes are electrically bonded in different ways to make creating demo circuits easy. On this breadboard, the two long rows on the outside (bounded by the blue and red lines) are bonded. In the center part, the columns are bonded.

    In my circuit here, I have the 3.3v and the ground on the outside rows (3.3v on the red, ground on the blue.)

  • The reason for using the 2N2222 transistor as opposed to just wiring up the ESP32 directly to the IR LED is that the ESP32 doesn’t have enough power to drive the IR LED directly. Using the transistor amplifies that enough that it has some reach (though in my testing it still needs to be within about 5 feet for it to work.)

Configuring ESPHome

Next step is to install esphome:

$ pip3 install esphome

And create a demo project.

$ esphome office_heater.yaml wizard

This will walk you through some basic steps getting ESPHome created and will create a YAML file that will look something like this:

esphome:
  name: office_heater
  platform: ESP32
  board: node32s

wifi:
  ssid: "Your WIFI"
  password: "Your WIFI password"

  # Enable fallback hotspot (captive portal) in case wifi connection fails
  ap:
    ssid: "Office Heater Fallback Hotspot"
    password: "kfrWiUnfT0JF"

captive_portal:

# Enable logging
logger:

# Enable Home Assistant API
api:

ota:

You can test this config by pushing it to your board that is connected by USB. Be aware that on the MELIFE boards that I used I have to put them in firmware upload mode by:

  1. Holding the boot button.
  2. Pushing the EN button.
  3. Letting go of the boot button after about 1 second.

You push it to your board by doing this:

$ esphome office_heater.yaml run

And you should see your board boot and connect to wifi. Even though it doesn’t actually do anything right now, it’s up and running.

Reading the IR Signals From The Existing Remote

Next thing we need to do is to figure out what our current remote is sending. And thankfully, esphome has some built-in functionality to do this. Add this to your YAML file and re-deploy:

remote_receiver:
  pin:
    number: GPIO16
    inverted: True
  dump: all

Deploy it to the board:

$ esphome office_heater.yaml run

And now, point your remote at the receiver and press a button. If everything is wired correctly, you should see it output the codes it received:

[16:49:49][D][remote.jvc:048]: Received JVC: data=0x007F
[16:49:49][D][remote.lg:053]: Received LG: data=0x007F00FF, nbits=32
[16:49:49][D][remote.nec:068]: Received NEC: address=0x007F, command=0x00FF
[16:49:49][D][remote.raw:041]: Received Raw: 9013, -2281, 610

This is what I recorded when I pushed the power button. So after all the buttons were pressed, these were the codes I discovered. I am using the LG codes here, by the way, and nbits was 32 for all of them:

  • Power On/Off: 0x007F00FF
  • Frost Protection Mode: 0x007F807F
  • Temperature Up: 0x007F40BF
  • Temperature Down: 0x007FC03F

So, now that we know what codes we need to send, we just need to send them.

Sending IR Codes

Theoretically, you can use any of these various formats when sending. Practically I only had luck using the LG ones (which kinda makes sense, LG does make HVAC systems.) So if you don’t have luck with the first set, try another code set.

Add the following to your configuration file:

remote_transmitter:
  pin: GPIO17
  carrier_duty_percent: 50%

switch:
  - platform: template
    name: Heater Power
    optimistic: True
    turn_on_action:
      - remote_transmitter.transmit_lg:
          data: 0x007F00FF
          nbits: 32
    turn_off_action:
      - remote_transmitter.transmit_lg:
          data: 0x007F00FF
          nbits: 32

Deploy it to the board:

$ esphome office_heater.yaml run

Next, go over to your Home Assistant installation. You should hopefully already see a notification of a new integration available so click through to that and install the ESPHome integration. If not, go to the integrations menu in configuration and manually install it. It should create a switch entity for you.

The newly created switch.office_heater.

Now, put the assembled prototype near the heater. In my testing it needed to be within about 5 feet distance and no more than a foot or so of vertical distance from the control panel on the heater. For testing I just sat mine on a chair right next to the heater.

Go over to Home Assistant and click the toggle to turn it on. Hopefully, if everything is configured correctly, the heater should turn on and you should see this in the logs:

[13:51:28][D][switch:021]: 'Heater Power' Turning ON.
[13:51:29][D][switch:045]: 'Heater Power': Sending state ON

You can optionally now remove the IR receiver and it’s wiring if you would like, as there is no reason to keep it around since you know all the codes you need. It would simplify your board a bit.

There are two big downsides to doing this that I have yet to solve:

  1. Because the same code is used for both turning on and turning off the heater, you have no idea whether the heater is actually on or off. You have to kind of rely on faith that your command was received and acted on by the heater.

  2. Because the same physical power button on the heater is also used to set the heater power level (first click is high, second click is medium, third click is low, fourth click is off), when you power on from the remote or your IR blaster, you turn it on high. But sending additional 0x007F00FF just turns it off. There doesn’t seem to be any way to adjust the power from the remote. :(

    This is not a huge deal because it remember the temperature settings, so once it reaches the target temperature it just turns off. But it is kind of a bummer that you can’t set the power level from the remote.

Next Steps

From here, you have a number of different options. I would like to 3D print an enclosure for this, but I don’t have access to a 3D printer (yet) so I just slapped it on the side of the heater front panel with some double-sided tape. I did have to bend the IR LED a bit to point upwards at the receiver. Otherwise it worked intermittently at best.

You could buy a solderable PCB demo board and solder the connections in place. The reason I have chosen not to do this so far is because I have Essential Tremor which makes doing things involving fine motor movement (like soldering) extremely difficult. You could also buy some copper-clad PCB laminate and etch your own PCB. I may attempt this at some point but, because it would still ultimately involve soldering, it is kind of low on my priority list since what I have works. You could probably even have a custom PCB fabricated.

Now that I have this working, I have it configured in Home Assistant to turn on the heater on workdays at 7am, when I am at home, and the temperature is below 55 outside. So now when I walk into my home office around 8:30 or 9am, my office is already toasty warm.

Presentation

Interested in learning more about this article? I recently gave a talk about my experience converting to and using Home Assistant. Feel free to check it out and watch the video:

About the Author

Hi, I'm Rob! I'm a blogger and software developer. I wrote petfeedd, dystill, and various other projects and libraries. I'm into electronics, general hackery, and model trains and airplanes. I am based in Huntsville, Alabama, USA.

About Me · Contact Me · Don't Hire Isaiah Armstrong

Did this article help you out?

I don't earn any money from this site.

I run no ads, sell no products and participate in no affiliate programs. I do not accept gifts in exchange for articles, guest articles or link exchanges. I don't track you or sell your data. The only third-party Javascript on this website is Google Analytics.

In general I run this site very much like a 1990s homepage or early 2000s personal blog, meaning that I do this solely because it's fun! I enjoy writing and sharing what I learn.

If you found this article helpful and want to show your appreciation, a tip or donation would be very welcome. Feel free to choose from the options below.

Comments (0)

Interested in why you can't leave comments on my blog? Read the article about why comments are uniquely terrible and need to die. If you are still interested in commenting on this article, feel free to reach out to me directly and/or share it on social media.

Contact Me
Share It

Interested in reading more?

Home Assistant

Hacking a Z-Wave Door Sensor Into a Mailbox Sensor for Home Assistant

My mailbox - yes, my physical mailbox where I receive actual mail - is one of the things that has stubbornly resisted my attempts to automate it. I’ve tried a few different solutions. Third party proprietary chimes. A Z-Wave tilt sensor on the door. But nothing has worked long-term.
Read More
Home Assistant

Securing Home Assistant Alexa Integration

One of the big missing pieces from my conversion to Home Assistant was Amazon Alexa integration. It wasn’t something we used a lot, but it was a nice to have. Especially for walking out a room and saying “Alexa, turn off the living room lights.” I had been putting it off a bit because the setup instructions are rather complex. But this weekend I found myself with a couple free hours and decided to work through it. It actually wasn’t as difficult as I expected it to be, but it is definitely not the type of thing a beginner or someone who does not have some programming and sysadmin background could accomplish. But in working through it, there was one thing that was an immediate red flag for me: the need to expose your Home Assistant installation to the Internet. It makes sense that you would need to do this - the Amazon mothership needs to send data to you to take an action after all. But exposing my entire home automation system to the Internet seems like a really, really bad idea. So in doing this, rather than expose port 443 on my router to the Internet and open my entire home to a Shodan attack, I decided to try something a bit different.
Read More
Home Assistant

Migrating from SmartThings to Home Assistant

I have been a SmartThings user for many years. The orginal reason was that, when we bought our current house in 2012, I wanted to turn the eave lights on at sunset and off a few hours later. After a short attempt to use Wifi-based Wemo switches, I settled on SmartThings and GE Z-Wave switches. I was so happy with it that I started putting them in more places. I added Kwikset SmartCode keypad locks and door sensors. I added more switches, like to turn on the garage overhead lights when the doors opened. I added sensors to monitor the temperature in the closet where I keep my server. And for many years this setup worked great. But over the last year, and especially since Samsung acquired SmartThings, I have become increasingly disillusioned with the SmartThings ecosystem. This last week, my disillusionment and frustration finally boiled over, and I migrated to a new platform. So why did I abandon SmartThings?
Read More